Difference between revisions of "Car Setups and Pitstop"
| (49 intermediate revisions by 5 users not shown) | |||
| Line 5: | Line 5: | ||
<translate> | <translate> | ||
| − | + | [[Image:Acc wiki carsetup engl 1.jpg|thumb|Multiple preset setups are available from the moment you start a session.]] <!--T:1--> | |
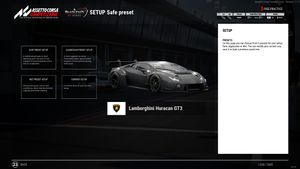
| − | + | When loading into a session, you will have a choice of preset setups you can load. By default, the "safe" preset is loaded and can be edited immediately. | |
| − | + | # Safe - A stable base setup. Recommended for finding a car that suits your driving style, but is more likely to understeer than other presets. | |
| + | # Aggressive - A more aggressive setup aimed towards drivers who are comfortable in a specific car. More oriented towards oversteer, and requires more precision in driving style (such as awareness of a car's individual nuances and general behaviour). | ||
| + | # Wet - A setup that caters to wet conditions, providing more rear downforce as well as optimisations to braking and stability. Not recommended for dry conditions. | ||
| + | # Current - Edit the currently loaded setup (by default, the Safe preset). | ||
| + | <br> | ||
| − | + | == Tyres == | |
| − | |||
| − | |||
| − | |||
| − | |||
| − | |||
| − | === | + | === Tire Pressures === <!--T:2--> |
| + | [[Image:Acc_wiki_carsetup_tyre.jpg|thumb|Tyre pressure and temperature are one of the most important parts of a setup.]] | ||
| − | + | Tyre pressures are one of the most vital components of a setup, and can make a big difference to tyre life and lap times. ACC uses pounds per square inch (psi) to measure tyre pressures. Real-time pressure values are displayed in the tire app. A visual representation of tyre inflation is given by the height of the middle segment of a given tyre. | |
| + | * If the centre segment of a tyre is shorter than the other two segments, the tyre is underinflated. | ||
| + | * If the centre segment of a tyre is longer than the other two segments, the tyre is overinflated. | ||
| + | ** Both of these scenarios will result in loss of overall grip. | ||
| − | + | A good strategy for tuning tyre pressures is to drive 5-10 laps, and watch the tire pressures at the end of the longest straight (usually at the start/finish line). These laps do not necessarily need to be fast, but should be consistent and repeatable. Remember the following when changing pressure settings: | |
| − | |||
| − | + | * Default setups, and thus default starting tyre pressures, usually return lower-than-optimum tyre pressure values after the tyres have warmed. Increasing the values in the tire setup menu may help to compensate for this. | |
| − | + | * The optimum tyre pressure range for Group GT3 cars is between 27.3 and 27.9 psi (with Pirelli's DHE compound, as used on 2020 tracks). | |
| + | **On 2018-2019 tracks, the optimum pressure range is between 27.0 and 28.0 psi (with Pirelli's DHD2 compound tyre, as used on 2018-19 tracks.). | ||
| + | ***This compound has better grip outside the optimal temperature range, but less grip within it, and is more prone to temperature change under load. | ||
| + | * The optimum tyre pressure range for Group GT4 cars is between 26.8 and 27.4 PSI are optimal (with Pirelli's DHA compound tyre). | ||
| + | * For all car classes, wet tyre pressures between 30.0 and 31.0 PSI are optimal (with Pirelli's WH compound tyre). | ||
| + | * To adjust for changing track temperatures, remember the following ratio: .08 psi for every 1C air temperature change. When the temperature increases, decrease the pressure, and vice versa. | ||
| − | <!--T: | + | === Tire Temperatures === <!--T:3--> |
| − | |||
| − | |||
| − | |||
| − | |||
| − | + | The tire app also gives a visual representation of which tyre set you are presently using (useful when these are restricted over a race weekend) as well as the three temperature "zones" of each tyre (O-M-I or I-M-O). Temperature is denoted by the colour of each tyre segment. | |
| − | |||
| − | + | The colour range for tyre app temperature visualisation is as follows: | |
| − | + | [[Image:ACC-tyre-guide.png||alt=|85 degrees Celsius is considered the "optimum" tyre temperature, but there is some leniency in this.]] | |
| − | + | ||
| − | The temperature | + | Numerical temperature values can be found either in the cockpit display (depending on vehicle) or in the setup menu. These readings are taken from the air in the tyre core, and don't represent tyre surface temperature. |
| + | [[Image:ACCTyreEx.jpg|300px|left|thumb|Tyres at optimum temperature, tyres after a spin, tyres after surface cools. Note how the air is still hot away from the surface, increasing tyre pressure.]] | ||
| + | Tyre temperature and tyre pressure are intrinsically linked. As the tyre surface heats up due to cornering load, the air closest to the surface of the tyre heats up. Since physics dictates that hot air rises, the high-pressure air will slowly rise to the top of the tyre core - pressurising and warming the tyre as it does so. This is why tyres suddenly begin to pressurise quickly after a spin, lock-up, or in a particularly heavy braking zone. If this happens, take it easy for a few corners until the temperatures and pressures have lowered again. | ||
| + | |||
| + | These factors are why the above tyre pressure tuning strategy is a good one to use - when the tyre has had time to heat up to its optimum temperature, it will give a more accurate "hot" pressure reading. Setting the wrong starting pressure will result in the tyre being wrongly inflated when it's up to temperature, which will reduce available grip. So make sure you take some time to get it right! | ||
| + | |||
| + | The optimum temperature for tyres in ACC is around 85 °C core temperature, although the tyres have a working range of around 10 °C either side of this, and will still be good to use within this range. Tyres that are too hot or too cold will have a considerably reduced amount of grip compared to tyres in the optimal temperature range, even if they're correctly pressurised - so it's crucial to ensure you don't over-work or even under-work the tyres in a race situation. | ||
| + | |||
| + | ==== Setup Menu Parameters ==== <!--T:4--> | ||
| − | |||
{| class="wikitable mw-datatable" | {| class="wikitable mw-datatable" | ||
|- | |- | ||
| − | ! Property !! | + | ! Property !! Description |
| + | |- | ||
| + | !colspan="2"| Last Readings | ||
| + | |- | ||
| + | | O M I / I M O || Temperature (°C) of the tyre segments: (O)utside / (M)iddle / (I)nside or (I)nside / (M)iddle / (O)utside (depending on side of car). | ||
|- | |- | ||
| − | + | | wear || Remaining tyre tread of the tyre segments (O/M/I or I/M/O) at the end of the previous run. | |
|- | |- | ||
| − | | | + | | psi hot || Highest recorded tyre pressure (psi) at any point during the previous run. |
|- | |- | ||
| − | | | + | | pad wear || Remaining width of the brake pads on this wheel at the end of the previous run. |
|- | |- | ||
| − | | wear || | + | | disc wear || Remaining width of the brake disc at the end of the previous run. |
|- | |- | ||
| − | !colspan="2"| | + | !colspan="2"| Tyres |
|- | |- | ||
| − | | psi || | + | | psi || Starting pressure of the tyre. For Group GT3 cars, this is the "warm" pressure (tyre warmers keep the tyre at around 70 °C). For Group GT4, which doesn't allow tyre warmers, this is the "cold" pressure (the tyre will start at around 30 °C). |
|- | |- | ||
| − | | toe || | + | | toe || This is the angle offset of the wheel relative to the direction of travel. More information: https://en.wikipedia.org/wiki/Toe_(automotive) |
|- | |- | ||
| − | | camber || | + | | camber || This is the vertical angle of the wheel relative to the roadway. More information: https://en.wikipedia.org/wiki/Camber_angle |
|- | |- | ||
| − | | caster || | + | | caster || This is the vertical angle of the rotational axis of the steering hub on the front wheels. More information: https://en.wikipedia.org/wiki/Caster_angle |
|} | |} | ||
| − | === | + | * Note that pad wear and disc wear are discussed in more detail later in this guide. |
| + | |||
| + | == Electronics == <!--T:5--> | ||
| + | |||
| + | [[Image:Acc wiki carsetup engl 3.jpg|thumb|The tech is there to help you. Don't be afraid to use it!]] | ||
| + | |||
| + | ===Group GT3=== <!--T:6--> | ||
| + | |||
| + | Group GT3 regulations permit traction control and anti-lock braking systems, and the cars are designed to be driven with them turned on. Using the systems effectively allows a driver to maximise performance while retaining control of the car at all times. | ||
| + | |||
| + | ==== Traction Control ==== <!--T:7--> | ||
| + | |||
| + | Traction control systems (TCS) aim to limit the amount of wheelslip in low-adhesion situations, and other scenarios involving high amounts of tyre slip. Most cars in ACC have a single-stage system, controlling both the limit of wheelslip allowed and the strength of the intervention from the system to prevent it. This is usually achieved by cutting the throttle, leading to a temporarily reduced power output and generating a distinctive sound. This can act as a signal to the the driver that TCS intervention is occurring. Each car has a different amount of available TC steps, but usually the number varies from around 8 to 12. | ||
| + | |||
| + | Some cars, such as the Ferrari 488 GT3 and the Porsche 911 GT3 R (and their Evo/911II variants respectively) have a 2-stage system (TC1 and TC2) in which these variables can be adjusted independently of each other. | ||
| + | |||
| + | ==== Anti-Lock Brakes ==== <!--T:8--> | ||
| + | |||
| + | Anti-lock braking systems (ABS) operate on a similar principle to traction control systems, but in reverse - they aim to prevent the wheels locking under braking, often due to too much traction as a result of an excessive brake application for the prevailing track conditions. The anti-locking effect is achieved by releasing pressure from the brake controlling the wheel that is locking, restoring rotational speed to the wheel. | ||
| + | |||
| + | Each car has a different amount of available ABS steps, but usually the number varies from around 9 to 12. | ||
| + | |||
| + | ==== ECU Mapping ==== <!--T:9--> | ||
| + | |||
| + | ECU maps are complicated systems that govern how much power should be deployed at any given percent of throttle. These maps differ greatly between cars and explaining it in short is nearly impossible. [[ECU Maps|This page]] goes into detail about what maps are available for each car in the simulation, and what they do. | ||
| + | |||
| + | ===Group GT4=== <!--T:10--> | ||
| + | |||
| + | Like their GT3 counterparts, most GT4 cars have traction control systems, though they only have single-stage operation as opposed to the more 2-stage systems of some GT3 cars, and some are less adjustable than their GT3 counterparts. This also applies to ABS systems; in most cars, there are fewer available levels of operation. The Maserati GranTurismo MC GT4 is the notable exception to this rule, as it has no TCS or ABS systems whatsoever. | ||
| + | |||
| + | Group GT4 cars generally do not have adjustable ECU maps, with the exception of the Mercedes-AMG GT4, which shares its ECU mapping with the GT3-spec car. | ||
| − | <!--T: | + | ==== Setup Menu Parameters ==== <!--T:11--> |
| − | |||
| − | |||
{| class="wikitable mw-datatable" | {| class="wikitable mw-datatable" | ||
|- | |- | ||
| − | ! Property | + | ! Property !! Description |
|- | |- | ||
| − | | TC || | + | | TC || Primary traction control setting. Higher values will generally result in more TCS intervention, which can lead to issues with understeer. In cars with 2-stage traction control, this is labelled TC1, and dictates the limit of wheel slip permitted before intervention occurs. |
|- | |- | ||
| − | | ABS | + | | ABS || Anti-lock braking system setting. Higher values will generally result in more ABS intervention, which can increase braking distances. |
|- | |- | ||
| − | | ECU Map | + | | ECU Map || Engine control unit mapping. Defines the amount of fuel sent to the engine, as well as throttle maps and engine braking. [[ECU Maps|This page lists ECU maps for each car.]] |
|- | |- | ||
| − | | | + | | Telemetry laps || This sets the number of laps to be recorded to the MoTeC datalogging file. |
* [[MoTeC_Support|MoTeC must be installed beforehand!]] | * [[MoTeC_Support|MoTeC must be installed beforehand!]] | ||
|- | |- | ||
| − | | TC2 || | + | | TC2 || Secondary traction control setting. Only available on cars with 2-stage traction control. The TC2 setting dictates the strength of the TCS system response when wheel slip, as governed by TC1, is detected. |
|} | |} | ||
| − | + | == Fuel and Strategy == <!--T:12--> | |
| + | |||
| + | [[Image:Acc_wiki_carsetup_fuel_and_strategy.jpg|thumb|Failure to prepare? Then prepare for failure. Always plan ahead!]] | ||
| − | <!--T: | + | While strategy considerations are likely to be one of the final things you do before a race, it is important to note that ACC lacks "warmup" sessions - so in the event that the pre-race countdown is very short, you may not have time to input your desired strategy before the race starts. As such, it is good practice to start thinking about your strategy in advance. This section of the setup menu allows you to do exactly that, by providing useful information about brake pad and brake disc wear over the previous on-track run, as well as detailed information about tyre sets you have used during the race weekend. |
| − | [[ | + | |
| + | ===Fuel=== <!--T:13--> | ||
| + | |||
| + | This menu is where you set your fuel load for practice, qualifying, and the start of the race. Going out with a light fuel load is great for hotlaps, but won't represent a race stint very well. Conversely, going out with a fuller tank will make you slower, but you'll be able to string more laps together and get a better feel for the car's behaviour over a stint. | ||
| + | |||
| + | The fuel estimate in the bottom of the fuel and tyre menu tends to over-estimate the fuel per lap, and will adjust itself as you complete laps in the session. It will begin adjusting after about 5 timed laps. Note that this does not take into account different ECU maps, and you should probably keep a note of how much fuel a given map uses if you're considering using it in the race. | ||
| + | |||
| + | === Tyre Wear === <!--T:14--> | ||
| + | |||
| + | As you complete laps on a set of tyres, they will slowly wear down. You can check what set of tyres you are on at any time using the tyre app. Once you've used a set of tyres and returned to the garage, you can see how much of the tyre tread is left. A new tyre will have 3mm of tread on it. Once a tyre reaches 1.5mm of remaining tread, it is considered worn - and will provide significantly less grip than a new tyre. At this point, it is recommended that you pit and have it replaced - over-wearing a tyre can cause it to puncture, which will take the choice out of your hands altogether! | ||
| + | |||
| + | === Graining, Blistering, and Flat Spots === <!--T:15--> | ||
| + | [[Image:Graining tyre.jpg|165px|thumb|Tyre graining, where the tread sticks to itself in small grains.]] | ||
| + | [[Image:Blistering tyre.jpg|165px|thumb|Tyre blistering, where the tread rises and ultimately peels off.]] | ||
| + | [[Image:Flatspotted tyre.jpeg|165px|thumb|Tyre flatspotting, where the tread wears in one specific place, causing vibrations.]] | ||
| + | |||
| + | As well as information on tyre tread wear, this menu also details the specific state of the tyre set selected - including information on graining, blistering, and flat spots. | ||
| + | |||
| + | * Tyres that are too cold will be prone to graining if pushed too hard. Graining is a specific wear pattern where the tyre tread does not fully separate as the tyre wears down - resulting in small grains of rubber sticking to the tyre and reducing the effective contact patch. | ||
| + | ** Graining is often a short-term issue, experienced in the earlier parts of a stint, and can often resolve itself as the tyre heats up and begins to wear normally - but can contribute to faster tyre grip fall-off. | ||
| + | * Tyres that are too hot will be prone to blistering if pushed too hard. Blistering is, in effect, the opposite to graining, where the tyre compound itself begins to degrade due to excess heat - resulting in small chunks of the tread lifting, and ultimately breaking away - reducing the effective contact patch. | ||
| + | ** Blistering often occurs near the end of a stint, and is considered to be far more serious than graining due to the potential of complete tyre failure if left unchecked. | ||
| + | * Flat-spots occur when the car locks up under braking, resulting in uneven wear to one specific portion of the tyre. These flat-spots cause vibrations in the suspension. Mild flat-spots tend only to cause annoyance, as they can be felt through force feedback, however severe flat-spots can cause a tyre to puncture, forcing its replacement. | ||
| + | |||
| + | === Brake pads === <!--T:16--> | ||
| + | |||
| + | This menu also shows how much wear the brake pads and discs have sustained during the previous run. There are 4 types of brake discs available for you to use: | ||
| − | |||
{| class="wikitable mw-datatable" | {| class="wikitable mw-datatable" | ||
|- | |- | ||
| − | ! | + | ! Value !! Description |
|- | |- | ||
| − | | | + | | 1 || "Sprint" brake pads. These pads have an excellent friction coefficient, with maximum braking performance - but notable amounts of disc and pad wear. Performance with brake modulation is somewhat linear. Their performance makes them perfect for sprint races (1-2 hours) and qualifying sessions. It is best not to use these pads beyond 2 hours of racing, as they will quickly start to overheat and lose linearity in brake pedal feel when worn out, making braking consistently a lot harder, and the pads may even begin to wear out before the 3 hour distance is reached - reducing braking power and potentially ending your race. |
|- | |- | ||
| − | | | + | | 2 || "Endurance" brake pads. These pads have a very good friction coefficient, with great braking performance and moderate disc and pad wear. Performance with brake modulation is very linear. These pads are the best choice for long races (3+ hours). What they lose in outright performance, they gain back in braking predictability and a more consistent feeling. The default choice for long endurance races, they will go 12 hours' distance easily - and with a bit of care, will make a full 24 hour race. They will still overheat and lose linearity in brake pedal feel when worn, but they do so in a more predictable way than the "sprint" pads. The lower friction coefficient of these pads means you could possibly use smaller brake ducts with them - which will help keep tyre temperatures and pressures more consistent over a race distance. |
|- | |- | ||
| − | | | + | | 3 || "Rain" brake pads. These pads have a good friction coefficient with good braking performance - but they excel in their very low disc and pad wear. Performance with brake modulation is almost always linear, and they will easily make a 24 hour race without issues. Their lower friction coefficient means that braking distances in optimal conditions will be longer than with pads 1 or 2, and as such should only be considered for the longest of endurance races in dry conditions - but these pads are an excellent choice for wet weather conditions, where more care is needed when braking. These pads rarely have issues with overheating when worn. |
|- | |- | ||
| − | | | + | |} |
| + | |||
| + | The fourth type of brake pads are an anomaly, and are thus not included in the above table. These pads are functionally useless. They have a very similar friction coefficient to brake pads 1, however they suffer from extreme disc and pad wear - and it is very hard to get a linear response from these pads, as they wear down and overheat very quickly, usually within 15 minutes of use. These pads should almost never be used, and do not even exist in the world of endurance racing. They are only included for demonstration purposes. | ||
| + | |||
| + | ===Pit Stop Strategy=== <!--T:17--> | ||
| + | |||
| + | Knowing all of this can help you to formulate a strategy in advance of the race. If you know, for example, your tyres will be very worn by the end of the race, you can schedule a pit stop and change them over for a fresh set halfway through - meaning you'll only need half the fuel for the race in your first stint, and your new set of tyres will almost certainly see you through once they're fitted. Race strategy itself can be a very complex game, but having a few plans dialled in before the race means you're prepared for almost any eventuality! | ||
| + | |||
| + | More information can be found here: [https://www.assettocorsa.net/forum/index.php?threads/race-weekend-tyre-sets-management-pitstop-strategy-and-fuel-load-testing.57824] | ||
| + | |||
| + | ==== Setup Menu Parameters ==== <!--T:18--> | ||
| + | |||
| + | {| class="wikitable mw-datatable" | ||
|- | |- | ||
| − | + | ! Property !! Description | |
|- | |- | ||
| − | | | + | | Wear || Remaining tyre tread of the tyre segments (O/M/I or I/M/O). See "Tires" section for more information. |
|- | |- | ||
| − | + | | Grain || Amount of tyre graining recorded during the last run. Graining is often exacerbated by low tyre temperatures. | |
|- | |- | ||
| − | | | + | | Blister || Amount of tyre blistering recorded during the last run. Blistering is often exacerbated by high tyre temperatures. |
|- | |- | ||
| − | | | + | | Flat Spot || Amount of flat-spotting recorded during the last run. Usually a symptom of too little ABS. |
|- | |- | ||
| − | | | + | | pad wear || The amount that the brake pads have worn in millimetres. At 12.5mm, the brakes are considered worn and it is recommended to replace them. |
| − | |||
| − | |||
| − | |||
| − | |||
| − | |||
| − | |||
| − | |||
| − | |||
|- | |- | ||
| − | | | + | | disc wear || The amount that the brake discs have worn in millimetres. Usually, a set of discs will last a 24 hour race - but in ACC, new discs are always fitted when brake pads are changed and this incurs no additional time penalty. |
|- | |- | ||
| − | + | !colspan="2"| Fuel and Tyre | |
|- | |- | ||
| − | | fuel | + | | fuel || The amount of fuel in the fuel tank upon exiting the pits/going to track. Maximum fuel load varies per car. |
|- | |- | ||
| − | + | | tyre || Choose the type of tyre, depending on prevailing track conditions. | |
|- | |- | ||
| − | | | + | | tyre set || |
| + | This allows you to change your currently installed tyre set. If limits on the number of tyre sets allowed are being enforced, the sets are limited as follows: | ||
| + | * Sprint race weekend: 5 sets | ||
| + | * 3-hour Endurance race weekend: 6 sets | ||
| + | * 6-hour Endurance race weekend: 9 sets | ||
| + | * 24-hour Endurance race weekend: no limit | ||
| + | ** There is no limit for wet tyre sets in any weekend length. | ||
|- | |- | ||
| − | | | + | | front brakes || The [[Car_Setups_and_Pitstop#Brake_pads|brake pads]] to be fitted to the front axle upon leaving the pits. |
|- | |- | ||
| − | | | + | | rear brakes || The [[Car_Setups_and_Pitstop#Brake_pads|brake pads]] to be fitted to the rear axle upon leaving the pits. |
|- | |- | ||
| − | | | + | | fuel per lap || Average fuel consumption per lap. Automatically calculated. Does not take [[ECU Maps|ECU mapping]] into consideration. |
|- | |- | ||
| − | + | !colspan="2"| Pitstop Strategy | |
|- | |- | ||
| − | | | + | | N° pitstop || Pitstop number. Can be used to store up to 30 pit scenarios for any given setup. |
|- | |- | ||
| − | | | + | | fuel to add || How much fuel to add to the fuel tank at the selected pitstop. |
|- | |- | ||
| − | | | + | | tyre || What compound (dry or wet) of tyre to fit at the selected pitstop. |
|- | |- | ||
| − | | | + | | tyre set || Which tyre set to fit at the selected pitstop. This option is disabled if the Wet compound is selected above. |
|- | |- | ||
| − | | | + | | left front || Cold/warm pressure of the left front tyre at fitment. |
| − | |||
| − | |||
| − | |||
| − | |||
| − | |||
| − | |||
|- | |- | ||
| − | + | | right front || Cold/warm pressure of the right front tyre at fitment. | |
|- | |- | ||
| − | | | + | | left rear || Cold/warm pressure of the left rear tyre at fitment. |
|- | |- | ||
| − | | | + | | right rear || Cold/warm pressure of the right rear tyre at fitment. |
|- | |- | ||
| − | | | + | | front brakes || The [[Car_Setups_and_Pitstop#Brake_pads|brake pads]] to be fitted to the front axle at the selected pitstop.. |
|- | |- | ||
| − | | | + | | rear brakes || The [[Car_Setups_and_Pitstop#Brake_pads|brake pads]] to be fitted to the rear axle at the selected pitstop. |
|} | |} | ||
| − | + | == Mechanical Grip == | |
| + | |||
| + | |||
| − | + | [[Image:Acc wiki carsetup engl 5.jpg|thumb|]] | |
| − | [[ | ||
| − | |||
{| class="wikitable mw-datatable" | {| class="wikitable mw-datatable" | ||
|- | |- | ||
| Line 206: | Line 278: | ||
|} | |} | ||
| − | + | == Dampers == | |
| − | + | [[Image:Acc wiki carsetup engl 6.jpg|thumb|Current Setup / TAB Dampers]] | |
| − | [[ | ||
| − | |||
{| class="wikitable mw-datatable" | {| class="wikitable mw-datatable" | ||
|- | |- | ||
| Line 227: | Line 297: | ||
|} | |} | ||
| − | + | == Aero == | |
| − | + | [[Image:Acc wiki carsetup engl 7.jpg|thumb|Current Setup / TAB Aero]] | |
| − | [[ | ||
| − | |||
{| class="wikitable mw-datatable" | {| class="wikitable mw-datatable" | ||
|- | |- | ||
| Line 239: | Line 307: | ||
!colspan="3"| Rear | !colspan="3"| Rear | ||
|- | |- | ||
| − | | rear ride height ||style="text-align:center;"| || | + | | rear ride height ||style="text-align:center;"| || Higher values offer stability over kerbs but reduce rear diffuser downforce. |
|- | |- | ||
| − | | | + | | rear wing ||style="text-align:center;"| 0 - ? || Higher values increase drag but increase rear downforce. |
|- | |- | ||
| − | | brake ducts ||style="text-align:center;"| | + | | brake ducts ||style="text-align:center;"| 0 - 6 || How much cooling the brake discs receive. 0 is fully closed, 6 is fully open. Affects aerodynamics and tyre temperatures somewhat. |
|- | |- | ||
!colspan="3"| Front | !colspan="3"| Front | ||
|- | |- | ||
| − | | front ride height ||style="text-align:center;"| || | + | | front ride height ||style="text-align:center;"| || Higher values offer stability over kerbs but reduce front splitter downforce. |
|- | |- | ||
| − | | splitter ||style="text-align:center;"| | + | | splitter ||style="text-align:center;"| 0 - ? || Higher values increase drag slightly but provide front downforce. Only adjustable on some cars. |
|- | |- | ||
| − | | brake ducts ||style="text-align:center;"| | + | | brake ducts ||style="text-align:center;"| 0 - 6 || How much cooling the brake discs receive. 0 is fully closed, 6 is fully open. Affects aerodynamics and tyre temperatures somewhat. |
|- | |- | ||
!colspan="3"| Fuel Load Test | !colspan="3"| Fuel Load Test | ||
|- | |- | ||
| − | | temporary fuel ||style="text-align:center;"| 0 litre - ? litre || Simulates the weight of the contents of the tank and the impact on the aero model of the car. Depending on where the tank is located in a car, it has different effects. | + | | temporary fuel ||style="text-align:center;"| 0 litre - ? litre || Simulates the weight of the contents of the tank and the impact on the aero model of the car. Depending on where the tank is located in a car, it has different effects. This setting can only be used in Practice sessions. |
|- | |- | ||
!colspan="3"| Front Aero Variation | !colspan="3"| Front Aero Variation | ||
|- | |- | ||
| − | | Base ride height ||style="text-align:center;"| xx rear - xx front x.x% || | + | | Base ride height ||style="text-align:center;"| xx rear - xx front x.x% || Percent of aerodynamic force bias towards the front of the car. Negative values indicate rearward aero bias. |
|} | |} | ||
| − | == Race Start Procedure == | + | == Race Start Procedure == |
| − | + | In ACC, a server administrator can specify three different methods for starting on a server (? [[Server_Configuration#settings.json|Server Configuration/settings.json]]) and whether a short or a complete Formation-Lap should take place. | |
| − | In ACC, a server administrator can specify three different methods for starting on a server ( | ||
| − | === with | + | === Controlled Start with Position Widget === <!--T:58--> |
| − | + | Each driver is guided through the start of the race by a widget. The driver must always try to stay in the green area. First is the single file at 90 km/h (if doing a full formation lap), then the double file at 60 km/h. | |
| − | Each driver is guided through the start of the race by a widget. The driver must always try to stay | ||
| − | |||
{| | {| | ||
|- | |- | ||
| Line 282: | Line 347: | ||
|} | |} | ||
| − | + | * You can press "Drive" 30 seconds before the end of the countdown. Don't forget to fill up on fuel, or change to your race setup. | |
| − | * You can press "Drive" 30 seconds before the end of the countdown. Don't forget to fill up | + | * You can now start your vehicle, but not change the gear or move. |
| − | * | + | * Once the timer hits 0, a "Rolling Start Procedure" warning is given. |
| − | * | + | * The pole-sitter starts first and all other vehicles are now unlocked one after the other and drivers can then engage 1st gear and drive off. Note: Collisions not are possible, cars can drive through each other. |
| − | * The pole-sitter starts first and all other vehicles are now unlocked one after the other and | + | * A widget is now displayed for every driver and you are asked to... |
| − | * A widget is now displayed for every driver and you are asked to ... | + | ** Drive in double file if not doing a full formation lap. |
| − | ** | + | ** Start in single file, then slow down and change to double file, usually before the last corner. |
| − | ** | + | * By always being on the green coloured scale of the widget, you are always in the right starting position. |
| − | * By always being on the green | + | * Shortly before the start, the widget will switch to a speed monitoring mode. Try to keep the speed in the green. |
| − | * | + | * Soon after the leader crosses the start-finish line, five flashing green lights will appear, and the race starts! |
| − | * Drive-through penalties are awarded for driving too fast and not adhering to the starting position | + | * Drive-through penalties are awarded for driving too fast and not adhering to the starting position. |
| − | === Old Mode === | + | === Old Mode === |
| − | + | * You can press "Drive" 30 seconds before the end of the countdown. Don't forget to fill up on fuel, or change to your race setup. | |
| − | * | + | * You can now start your vehicle, but not change the gear or move. |
| − | * | + | * Once the timer hits 0, everyone can drive off. Note: collisions are possible, so don't try to drive through other cars. |
| − | * everyone can | + | * The vehicle's speeds are locked at around 90km/h |
| − | * at | + | * There is no positional control, cars are free to be in whatever position possible. As such, no penalties are awarded automatically. |
| − | * | ||
| − | |||
| − | === Free Mode === | + | === Free Mode === |
| − | + | At the start of the race, only the traffic lights are shown. This is usually only used by leagues that have their own race control. | |
| − | At the start of the race, only the traffic lights are shown. This is | ||
| − | == Pitstop == | + | == Pitstop == |
| − | |||
A pit stop to refuel missing gas or repair damage is possible in practice, qualifying and racing. A driver can set his pit stop strategy in the vehicle setup (Fuel and Strategy) and change it while driving in the multifunction display (MFD). | A pit stop to refuel missing gas or repair damage is possible in practice, qualifying and racing. A driver can set his pit stop strategy in the vehicle setup (Fuel and Strategy) and change it while driving in the multifunction display (MFD). | ||
In a race without a compulsory pit stop, the pit lane is opened when the leader of the race has finished the first lap. In the middle of the lower part of the screen, the message of the race control is displayed: ''RCTL Pitlane is open'' | In a race without a compulsory pit stop, the pit lane is opened when the leader of the race has finished the first lap. In the middle of the lower part of the screen, the message of the race control is displayed: ''RCTL Pitlane is open'' | ||
| − | |||
[[File:Acc-wiki rctl pitlane ist open.jpg|500px]] | [[File:Acc-wiki rctl pitlane ist open.jpg|500px]] | ||
| − | + | Server Configuration, see here: ?[[Server_Configuration#eventRules.json|eventRules.json]] | |
| − | Server Configuration, see here: | ||
| − | === Mandatory Pitstop === | + | === Mandatory Pitstop === |
| − | |||
* Variant 1: mandatory Pitstop possible throughout the race. | * Variant 1: mandatory Pitstop possible throughout the race. | ||
* Variant 2: mandatory Pitstop Window is limited in time. (Pitstop for damage repair always possible) | * Variant 2: mandatory Pitstop Window is limited in time. (Pitstop for damage repair always possible) | ||
| Line 332: | Line 390: | ||
** driver swap | ** driver swap | ||
| − | + | Server Configuration, see here: ?[[Server_Configuration#eventRules.json|eventRules.json]] | |
| − | Server Configuration, see here: | ||
=== Driver Swap === <!--T:8--> | === Driver Swap === <!--T:8--> | ||
| − | |||
<span style="color:red;">(in MP: Swapping the riders works, but the operation is not intuitive and faulty! Last time tested: 17.11.2019 ACCv1.1.2)</span> | <span style="color:red;">(in MP: Swapping the riders works, but the operation is not intuitive and faulty! Last time tested: 17.11.2019 ACCv1.1.2)</span> | ||
| − | |||
[[File:Acc-wiki pit driverswap.jpg|thumb|Pit / Driver Swap]] | [[File:Acc-wiki pit driverswap.jpg|thumb|Pit / Driver Swap]] | ||
| − | + | Several drivers (in Blancpain real: 2-4) can form a team. All drivers can be on the server. The waiting drivers are not considered spectators in the sense of ?[[Server Configuration#Spactator_Mode|Spectator Mode]]. | |
| − | Several drivers (in Blancpain real: 2-4) can form a team. All drivers can be on the server. The waiting drivers are not considered spectators in the sense of | ||
| − | |||
Using the Pit strategy page in the ( M )ulti(F )unctional( D )isplay (key: insert), the driver can assign a driver swap which will be automatically executed during the next pitstop. | Using the Pit strategy page in the ( M )ulti(F )unctional( D )isplay (key: insert), the driver can assign a driver swap which will be automatically executed during the next pitstop. | ||
| − | |||
In a training or qualification session, drivers of a team can use the chat command to swap drivers while the car is in the pit lane. Simply use the chat command and enter the space in the team widget. For example in "& swap 1" the driver changes to the driver who comes first. The waiting driver must be on the server. | In a training or qualification session, drivers of a team can use the chat command to swap drivers while the car is in the pit lane. Simply use the chat command and enter the space in the team widget. For example in "& swap 1" the driver changes to the driver who comes first. The waiting driver must be on the server. | ||
| − | + | Server Configuration, see here: ?[[Server_Configuration#eventRules.json|eventRules.json]] and ?[[Server_Configuration#entrylist.json|entylist.json]] | |
| − | Server Configuration, see here: | ||
| − | == References == | + | == References == |
| − | |||
# [https://www.assettocorsa.net/forum/index.php?threads/suspension-and-spart-setups-i-mean-setups.50846/ Suspension and Spart... setups, I mean setups!] - Kunos Forum - ACC Blog von Aristotelis | # [https://www.assettocorsa.net/forum/index.php?threads/suspension-and-spart-setups-i-mean-setups.50846/ Suspension and Spart... setups, I mean setups!] - Kunos Forum - ACC Blog von Aristotelis | ||
# [https://www.assettocorsa.net/forum/index.php?threads/ecu-maps-implementation.54472/ ECU maps implementation] - Kunos Forum - ACC Blog von Aristotelis | # [https://www.assettocorsa.net/forum/index.php?threads/ecu-maps-implementation.54472/ ECU maps implementation] - Kunos Forum - ACC Blog von Aristotelis | ||
Latest revision as of 05:12, 23 October 2021
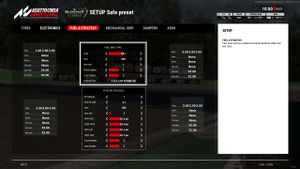
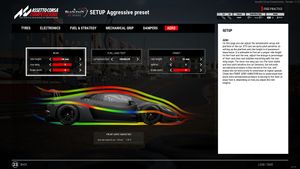
When loading into a session, you will have a choice of preset setups you can load. By default, the "safe" preset is loaded and can be edited immediately.
- Safe - A stable base setup. Recommended for finding a car that suits your driving style, but is more likely to understeer than other presets.
- Aggressive - A more aggressive setup aimed towards drivers who are comfortable in a specific car. More oriented towards oversteer, and requires more precision in driving style (such as awareness of a car's individual nuances and general behaviour).
- Wet - A setup that caters to wet conditions, providing more rear downforce as well as optimisations to braking and stability. Not recommended for dry conditions.
- Current - Edit the currently loaded setup (by default, the Safe preset).
Tyres
Tire Pressures
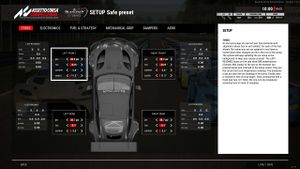
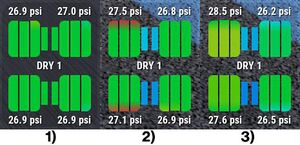
Tyre pressures are one of the most vital components of a setup, and can make a big difference to tyre life and lap times. ACC uses pounds per square inch (psi) to measure tyre pressures. Real-time pressure values are displayed in the tire app. A visual representation of tyre inflation is given by the height of the middle segment of a given tyre.
- If the centre segment of a tyre is shorter than the other two segments, the tyre is underinflated.
- If the centre segment of a tyre is longer than the other two segments, the tyre is overinflated.
- Both of these scenarios will result in loss of overall grip.
A good strategy for tuning tyre pressures is to drive 5-10 laps, and watch the tire pressures at the end of the longest straight (usually at the start/finish line). These laps do not necessarily need to be fast, but should be consistent and repeatable. Remember the following when changing pressure settings:
- Default setups, and thus default starting tyre pressures, usually return lower-than-optimum tyre pressure values after the tyres have warmed. Increasing the values in the tire setup menu may help to compensate for this.
- The optimum tyre pressure range for Group GT3 cars is between 27.3 and 27.9 psi (with Pirelli's DHE compound, as used on 2020 tracks).
- On 2018-2019 tracks, the optimum pressure range is between 27.0 and 28.0 psi (with Pirelli's DHD2 compound tyre, as used on 2018-19 tracks.).
- This compound has better grip outside the optimal temperature range, but less grip within it, and is more prone to temperature change under load.
- On 2018-2019 tracks, the optimum pressure range is between 27.0 and 28.0 psi (with Pirelli's DHD2 compound tyre, as used on 2018-19 tracks.).
- The optimum tyre pressure range for Group GT4 cars is between 26.8 and 27.4 PSI are optimal (with Pirelli's DHA compound tyre).
- For all car classes, wet tyre pressures between 30.0 and 31.0 PSI are optimal (with Pirelli's WH compound tyre).
- To adjust for changing track temperatures, remember the following ratio: .08 psi for every 1C air temperature change. When the temperature increases, decrease the pressure, and vice versa.
Tire Temperatures
The tire app also gives a visual representation of which tyre set you are presently using (useful when these are restricted over a race weekend) as well as the three temperature "zones" of each tyre (O-M-I or I-M-O). Temperature is denoted by the colour of each tyre segment.
The colour range for tyre app temperature visualisation is as follows:
Numerical temperature values can be found either in the cockpit display (depending on vehicle) or in the setup menu. These readings are taken from the air in the tyre core, and don't represent tyre surface temperature.
Tyre temperature and tyre pressure are intrinsically linked. As the tyre surface heats up due to cornering load, the air closest to the surface of the tyre heats up. Since physics dictates that hot air rises, the high-pressure air will slowly rise to the top of the tyre core - pressurising and warming the tyre as it does so. This is why tyres suddenly begin to pressurise quickly after a spin, lock-up, or in a particularly heavy braking zone. If this happens, take it easy for a few corners until the temperatures and pressures have lowered again.
These factors are why the above tyre pressure tuning strategy is a good one to use - when the tyre has had time to heat up to its optimum temperature, it will give a more accurate "hot" pressure reading. Setting the wrong starting pressure will result in the tyre being wrongly inflated when it's up to temperature, which will reduce available grip. So make sure you take some time to get it right!
The optimum temperature for tyres in ACC is around 85 °C core temperature, although the tyres have a working range of around 10 °C either side of this, and will still be good to use within this range. Tyres that are too hot or too cold will have a considerably reduced amount of grip compared to tyres in the optimal temperature range, even if they're correctly pressurised - so it's crucial to ensure you don't over-work or even under-work the tyres in a race situation.
Setup Menu Parameters
| Property | Description |
|---|---|
| Last Readings | |
| O M I / I M O | Temperature (°C) of the tyre segments: (O)utside / (M)iddle / (I)nside or (I)nside / (M)iddle / (O)utside (depending on side of car). |
| wear | Remaining tyre tread of the tyre segments (O/M/I or I/M/O) at the end of the previous run. |
| psi hot | Highest recorded tyre pressure (psi) at any point during the previous run. |
| pad wear | Remaining width of the brake pads on this wheel at the end of the previous run. |
| disc wear | Remaining width of the brake disc at the end of the previous run. |
| Tyres | |
| psi | Starting pressure of the tyre. For Group GT3 cars, this is the "warm" pressure (tyre warmers keep the tyre at around 70 °C). For Group GT4, which doesn't allow tyre warmers, this is the "cold" pressure (the tyre will start at around 30 °C). |
| toe | This is the angle offset of the wheel relative to the direction of travel. More information: https://en.wikipedia.org/wiki/Toe_(automotive) |
| camber | This is the vertical angle of the wheel relative to the roadway. More information: https://en.wikipedia.org/wiki/Camber_angle |
| caster | This is the vertical angle of the rotational axis of the steering hub on the front wheels. More information: https://en.wikipedia.org/wiki/Caster_angle |
- Note that pad wear and disc wear are discussed in more detail later in this guide.
Electronics
Group GT3
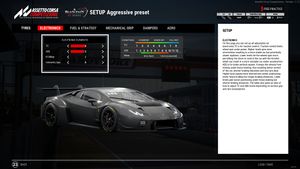
Group GT3 regulations permit traction control and anti-lock braking systems, and the cars are designed to be driven with them turned on. Using the systems effectively allows a driver to maximise performance while retaining control of the car at all times.
Traction Control
Traction control systems (TCS) aim to limit the amount of wheelslip in low-adhesion situations, and other scenarios involving high amounts of tyre slip. Most cars in ACC have a single-stage system, controlling both the limit of wheelslip allowed and the strength of the intervention from the system to prevent it. This is usually achieved by cutting the throttle, leading to a temporarily reduced power output and generating a distinctive sound. This can act as a signal to the the driver that TCS intervention is occurring. Each car has a different amount of available TC steps, but usually the number varies from around 8 to 12.
Some cars, such as the Ferrari 488 GT3 and the Porsche 911 GT3 R (and their Evo/911II variants respectively) have a 2-stage system (TC1 and TC2) in which these variables can be adjusted independently of each other.
Anti-Lock Brakes
Anti-lock braking systems (ABS) operate on a similar principle to traction control systems, but in reverse - they aim to prevent the wheels locking under braking, often due to too much traction as a result of an excessive brake application for the prevailing track conditions. The anti-locking effect is achieved by releasing pressure from the brake controlling the wheel that is locking, restoring rotational speed to the wheel.
Each car has a different amount of available ABS steps, but usually the number varies from around 9 to 12.
ECU Mapping
ECU maps are complicated systems that govern how much power should be deployed at any given percent of throttle. These maps differ greatly between cars and explaining it in short is nearly impossible. This page goes into detail about what maps are available for each car in the simulation, and what they do.
Group GT4
Like their GT3 counterparts, most GT4 cars have traction control systems, though they only have single-stage operation as opposed to the more 2-stage systems of some GT3 cars, and some are less adjustable than their GT3 counterparts. This also applies to ABS systems; in most cars, there are fewer available levels of operation. The Maserati GranTurismo MC GT4 is the notable exception to this rule, as it has no TCS or ABS systems whatsoever.
Group GT4 cars generally do not have adjustable ECU maps, with the exception of the Mercedes-AMG GT4, which shares its ECU mapping with the GT3-spec car.
Setup Menu Parameters
| Property | Description |
|---|---|
| TC | Primary traction control setting. Higher values will generally result in more TCS intervention, which can lead to issues with understeer. In cars with 2-stage traction control, this is labelled TC1, and dictates the limit of wheel slip permitted before intervention occurs. |
| ABS | Anti-lock braking system setting. Higher values will generally result in more ABS intervention, which can increase braking distances. |
| ECU Map | Engine control unit mapping. Defines the amount of fuel sent to the engine, as well as throttle maps and engine braking. This page lists ECU maps for each car. |
| Telemetry laps | This sets the number of laps to be recorded to the MoTeC datalogging file. |
| TC2 | Secondary traction control setting. Only available on cars with 2-stage traction control. The TC2 setting dictates the strength of the TCS system response when wheel slip, as governed by TC1, is detected. |
Fuel and Strategy
While strategy considerations are likely to be one of the final things you do before a race, it is important to note that ACC lacks "warmup" sessions - so in the event that the pre-race countdown is very short, you may not have time to input your desired strategy before the race starts. As such, it is good practice to start thinking about your strategy in advance. This section of the setup menu allows you to do exactly that, by providing useful information about brake pad and brake disc wear over the previous on-track run, as well as detailed information about tyre sets you have used during the race weekend.
Fuel
This menu is where you set your fuel load for practice, qualifying, and the start of the race. Going out with a light fuel load is great for hotlaps, but won't represent a race stint very well. Conversely, going out with a fuller tank will make you slower, but you'll be able to string more laps together and get a better feel for the car's behaviour over a stint.
The fuel estimate in the bottom of the fuel and tyre menu tends to over-estimate the fuel per lap, and will adjust itself as you complete laps in the session. It will begin adjusting after about 5 timed laps. Note that this does not take into account different ECU maps, and you should probably keep a note of how much fuel a given map uses if you're considering using it in the race.
Tyre Wear
As you complete laps on a set of tyres, they will slowly wear down. You can check what set of tyres you are on at any time using the tyre app. Once you've used a set of tyres and returned to the garage, you can see how much of the tyre tread is left. A new tyre will have 3mm of tread on it. Once a tyre reaches 1.5mm of remaining tread, it is considered worn - and will provide significantly less grip than a new tyre. At this point, it is recommended that you pit and have it replaced - over-wearing a tyre can cause it to puncture, which will take the choice out of your hands altogether!
Graining, Blistering, and Flat Spots
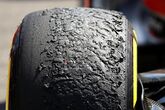
As well as information on tyre tread wear, this menu also details the specific state of the tyre set selected - including information on graining, blistering, and flat spots.
- Tyres that are too cold will be prone to graining if pushed too hard. Graining is a specific wear pattern where the tyre tread does not fully separate as the tyre wears down - resulting in small grains of rubber sticking to the tyre and reducing the effective contact patch.
- Graining is often a short-term issue, experienced in the earlier parts of a stint, and can often resolve itself as the tyre heats up and begins to wear normally - but can contribute to faster tyre grip fall-off.
- Tyres that are too hot will be prone to blistering if pushed too hard. Blistering is, in effect, the opposite to graining, where the tyre compound itself begins to degrade due to excess heat - resulting in small chunks of the tread lifting, and ultimately breaking away - reducing the effective contact patch.
- Blistering often occurs near the end of a stint, and is considered to be far more serious than graining due to the potential of complete tyre failure if left unchecked.
- Flat-spots occur when the car locks up under braking, resulting in uneven wear to one specific portion of the tyre. These flat-spots cause vibrations in the suspension. Mild flat-spots tend only to cause annoyance, as they can be felt through force feedback, however severe flat-spots can cause a tyre to puncture, forcing its replacement.
Brake pads
This menu also shows how much wear the brake pads and discs have sustained during the previous run. There are 4 types of brake discs available for you to use:
| Value | Description |
|---|---|
| 1 | "Sprint" brake pads. These pads have an excellent friction coefficient, with maximum braking performance - but notable amounts of disc and pad wear. Performance with brake modulation is somewhat linear. Their performance makes them perfect for sprint races (1-2 hours) and qualifying sessions. It is best not to use these pads beyond 2 hours of racing, as they will quickly start to overheat and lose linearity in brake pedal feel when worn out, making braking consistently a lot harder, and the pads may even begin to wear out before the 3 hour distance is reached - reducing braking power and potentially ending your race. |
| 2 | "Endurance" brake pads. These pads have a very good friction coefficient, with great braking performance and moderate disc and pad wear. Performance with brake modulation is very linear. These pads are the best choice for long races (3+ hours). What they lose in outright performance, they gain back in braking predictability and a more consistent feeling. The default choice for long endurance races, they will go 12 hours' distance easily - and with a bit of care, will make a full 24 hour race. They will still overheat and lose linearity in brake pedal feel when worn, but they do so in a more predictable way than the "sprint" pads. The lower friction coefficient of these pads means you could possibly use smaller brake ducts with them - which will help keep tyre temperatures and pressures more consistent over a race distance. |
| 3 | "Rain" brake pads. These pads have a good friction coefficient with good braking performance - but they excel in their very low disc and pad wear. Performance with brake modulation is almost always linear, and they will easily make a 24 hour race without issues. Their lower friction coefficient means that braking distances in optimal conditions will be longer than with pads 1 or 2, and as such should only be considered for the longest of endurance races in dry conditions - but these pads are an excellent choice for wet weather conditions, where more care is needed when braking. These pads rarely have issues with overheating when worn. |
The fourth type of brake pads are an anomaly, and are thus not included in the above table. These pads are functionally useless. They have a very similar friction coefficient to brake pads 1, however they suffer from extreme disc and pad wear - and it is very hard to get a linear response from these pads, as they wear down and overheat very quickly, usually within 15 minutes of use. These pads should almost never be used, and do not even exist in the world of endurance racing. They are only included for demonstration purposes.
Pit Stop Strategy
Knowing all of this can help you to formulate a strategy in advance of the race. If you know, for example, your tyres will be very worn by the end of the race, you can schedule a pit stop and change them over for a fresh set halfway through - meaning you'll only need half the fuel for the race in your first stint, and your new set of tyres will almost certainly see you through once they're fitted. Race strategy itself can be a very complex game, but having a few plans dialled in before the race means you're prepared for almost any eventuality!
More information can be found here: [1]
Setup Menu Parameters
| Property | Description |
|---|---|
| Wear | Remaining tyre tread of the tyre segments (O/M/I or I/M/O). See "Tires" section for more information. |
| Grain | Amount of tyre graining recorded during the last run. Graining is often exacerbated by low tyre temperatures. |
| Blister | Amount of tyre blistering recorded during the last run. Blistering is often exacerbated by high tyre temperatures. |
| Flat Spot | Amount of flat-spotting recorded during the last run. Usually a symptom of too little ABS. |
| pad wear | The amount that the brake pads have worn in millimetres. At 12.5mm, the brakes are considered worn and it is recommended to replace them. |
| disc wear | The amount that the brake discs have worn in millimetres. Usually, a set of discs will last a 24 hour race - but in ACC, new discs are always fitted when brake pads are changed and this incurs no additional time penalty. |
| Fuel and Tyre | |
| fuel | The amount of fuel in the fuel tank upon exiting the pits/going to track. Maximum fuel load varies per car. |
| tyre | Choose the type of tyre, depending on prevailing track conditions. |
| tyre set |
This allows you to change your currently installed tyre set. If limits on the number of tyre sets allowed are being enforced, the sets are limited as follows:
|
| front brakes | The brake pads to be fitted to the front axle upon leaving the pits. |
| rear brakes | The brake pads to be fitted to the rear axle upon leaving the pits. |
| fuel per lap | Average fuel consumption per lap. Automatically calculated. Does not take ECU mapping into consideration. |
| Pitstop Strategy | |
| N° pitstop | Pitstop number. Can be used to store up to 30 pit scenarios for any given setup. |
| fuel to add | How much fuel to add to the fuel tank at the selected pitstop. |
| tyre | What compound (dry or wet) of tyre to fit at the selected pitstop. |
| tyre set | Which tyre set to fit at the selected pitstop. This option is disabled if the Wet compound is selected above. |
| left front | Cold/warm pressure of the left front tyre at fitment. |
| right front | Cold/warm pressure of the right front tyre at fitment. |
| left rear | Cold/warm pressure of the left rear tyre at fitment. |
| right rear | Cold/warm pressure of the right rear tyre at fitment. |
| front brakes | The brake pads to be fitted to the front axle at the selected pitstop.. |
| rear brakes | The brake pads to be fitted to the rear axle at the selected pitstop. |
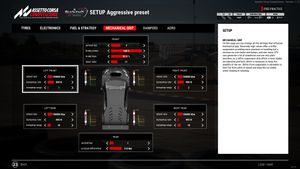
Mechanical Grip
| Property | Values | Description |
|---|---|---|
| Front | ||
| antiroll bar | ||
| brake power | ||
| brake bias | ||
| steer ratio | ||
| Rear | ||
| antiroll bar | ||
| preload differential | ||
| Rear/Front - Left/Right | ||
| wheel rate | ||
| bumpstop rate | ||
| bumpstop range | ||
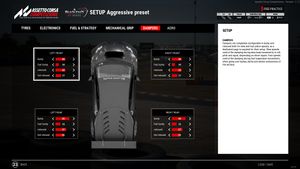
Dampers
| Property | Values | Description |
|---|---|---|
| Rear/Front - Left/Right | ||
| bump | stops the springs oscillation inward. A higher number wil dampen the compression at a slow rate more. | |
| fast bump | A higher number wil dampen the compression at a high rate more. | |
| rebound | stops the springs oscillation outward. A higher number wil dampen the decompression at a slow rate more. | |
| fast rebound | A higher number wil dampen the decompression at a high rate more. | |
Aero
| Property | Values | Description |
|---|---|---|
| Rear | ||
| rear ride height | Higher values offer stability over kerbs but reduce rear diffuser downforce. | |
| rear wing | 0 - ? | Higher values increase drag but increase rear downforce. |
| brake ducts | 0 - 6 | How much cooling the brake discs receive. 0 is fully closed, 6 is fully open. Affects aerodynamics and tyre temperatures somewhat. |
| Front | ||
| front ride height | Higher values offer stability over kerbs but reduce front splitter downforce. | |
| splitter | 0 - ? | Higher values increase drag slightly but provide front downforce. Only adjustable on some cars. |
| brake ducts | 0 - 6 | How much cooling the brake discs receive. 0 is fully closed, 6 is fully open. Affects aerodynamics and tyre temperatures somewhat. |
| Fuel Load Test | ||
| temporary fuel | 0 litre - ? litre | Simulates the weight of the contents of the tank and the impact on the aero model of the car. Depending on where the tank is located in a car, it has different effects. This setting can only be used in Practice sessions. |
| Front Aero Variation | ||
| Base ride height | xx rear - xx front x.x% | Percent of aerodynamic force bias towards the front of the car. Negative values indicate rearward aero bias. |
Race Start Procedure
In ACC, a server administrator can specify three different methods for starting on a server (? Server Configuration/settings.json) and whether a short or a complete Formation-Lap should take place.
Controlled Start with Position Widget
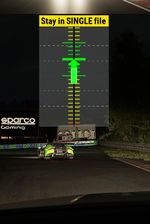
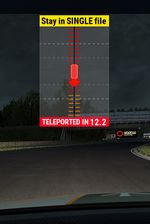
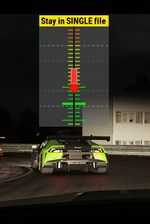
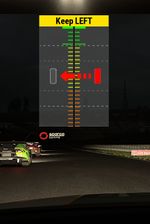
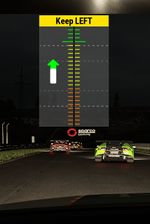
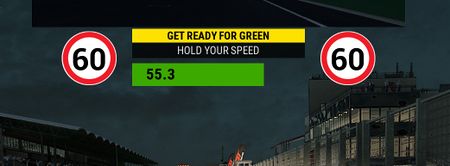
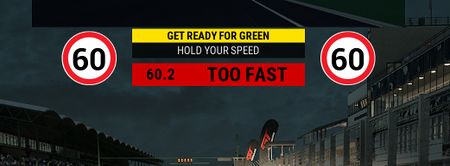
Each driver is guided through the start of the race by a widget. The driver must always try to stay in the green area. First is the single file at 90 km/h (if doing a full formation lap), then the double file at 60 km/h.
| ||||||
 |
 |
 |
 |
 |
 |
|
 |
| |||||
- You can press "Drive" 30 seconds before the end of the countdown. Don't forget to fill up on fuel, or change to your race setup.
- You can now start your vehicle, but not change the gear or move.
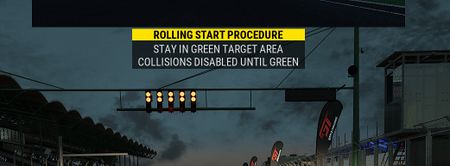
- Once the timer hits 0, a "Rolling Start Procedure" warning is given.
- The pole-sitter starts first and all other vehicles are now unlocked one after the other and drivers can then engage 1st gear and drive off. Note: Collisions not are possible, cars can drive through each other.
- A widget is now displayed for every driver and you are asked to...
- Drive in double file if not doing a full formation lap.
- Start in single file, then slow down and change to double file, usually before the last corner.
- By always being on the green coloured scale of the widget, you are always in the right starting position.
- Shortly before the start, the widget will switch to a speed monitoring mode. Try to keep the speed in the green.
- Soon after the leader crosses the start-finish line, five flashing green lights will appear, and the race starts!
- Drive-through penalties are awarded for driving too fast and not adhering to the starting position.
Old Mode
- You can press "Drive" 30 seconds before the end of the countdown. Don't forget to fill up on fuel, or change to your race setup.
- You can now start your vehicle, but not change the gear or move.
- Once the timer hits 0, everyone can drive off. Note: collisions are possible, so don't try to drive through other cars.
- The vehicle's speeds are locked at around 90km/h
- There is no positional control, cars are free to be in whatever position possible. As such, no penalties are awarded automatically.
Free Mode
At the start of the race, only the traffic lights are shown. This is usually only used by leagues that have their own race control.
Pitstop
A pit stop to refuel missing gas or repair damage is possible in practice, qualifying and racing. A driver can set his pit stop strategy in the vehicle setup (Fuel and Strategy) and change it while driving in the multifunction display (MFD). In a race without a compulsory pit stop, the pit lane is opened when the leader of the race has finished the first lap. In the middle of the lower part of the screen, the message of the race control is displayed: RCTL Pitlane is open
Server Configuration, see here: ?eventRules.json
Mandatory Pitstop
- Variant 1: mandatory Pitstop possible throughout the race.
- Variant 2: mandatory Pitstop Window is limited in time. (Pitstop for damage repair always possible)
- Example: Race: 18 min / Window: 6min = from 6. Minute to 12. Minute

- What can be required for a mandatory pit stop?
- refueling
- change wheels
- driver swap
Server Configuration, see here: ?eventRules.json
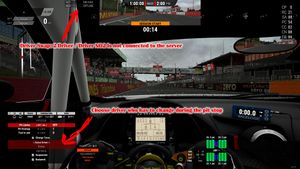
Driver Swap
(in MP: Swapping the riders works, but the operation is not intuitive and faulty! Last time tested: 17.11.2019 ACCv1.1.2)
Several drivers (in Blancpain real: 2-4) can form a team. All drivers can be on the server. The waiting drivers are not considered spectators in the sense of ?Spectator Mode.
Using the Pit strategy page in the ( M )ulti(F )unctional( D )isplay (key: insert), the driver can assign a driver swap which will be automatically executed during the next pitstop.
In a training or qualification session, drivers of a team can use the chat command to swap drivers while the car is in the pit lane. Simply use the chat command and enter the space in the team widget. For example in "& swap 1" the driver changes to the driver who comes first. The waiting driver must be on the server.
Server Configuration, see here: ?eventRules.json and ?entylist.json
References
- Suspension and Spart... setups, I mean setups! - Kunos Forum - ACC Blog von Aristotelis
- ECU maps implementation - Kunos Forum - ACC Blog von Aristotelis
- Brake ducts and Tyre damage - Kunos Forum - ACC Blog von Aristotelis
- Bumpstop telemetry in the setup screen - Kunos Forum - ACC Blog von Aristotelis
- https://en.wikipedia.org/wiki/Caster_angle
- https://en.wikipedia.org/wiki/Camber_angle
- MSRL - Midnight Sim Racing Liga - YouTube Playlist: MSRL SetupGuide (German):
