Difference between revisions of "Car Setups and Pitstop"
| Line 29: | Line 29: | ||
<!--T:40--> | <!--T:40--> | ||
Follow these steps to tune your tyre pressures: | Follow these steps to tune your tyre pressures: | ||
| − | * Drive 10 laps and watch the tire pressures at the end of the longest straight, usually at the start/finish line. | + | * Drive 5-10 laps and watch the tire pressures at the end of the longest straight, usually at the start/finish line. |
| − | * The optimum GT3 tyre pressure is between 27.3 and 27.9 PSI (with DHE | + | * The optimum GT3 tyre pressure is between 27.3 and 27.9 PSI (with DHE compound - 2020 tracks). For GT4 cars, tyre pressures between 26.8 and 27.4 PSI are optimal. For wet tyres, pressures between 30.0 and 31.0 PSI are optimal. Going under this will result in underinflation and a loss of grip, going over this will result in overinflation and a loss of grip. |
* The default settings usually give you lower values. Increase the values in the tire setup menu to compensate for this difference. | * The default settings usually give you lower values. Increase the values in the tire setup menu to compensate for this difference. | ||
| − | * To adjust for changing track temperatures, remember the following ratio: . | + | * To adjust for changing track temperatures, remember the following ratio: .08 psi for every 1C air temperature change. When the temperature increases, decrease the pressure, and vice versa. |
<!--T:71--> | <!--T:71--> | ||
| − | Note: On 2018-2019 tracks the optimum tire pressure is 27.0-28.0 PSI ( | + | Note: On 2018-2019 tracks, the optimum tire pressure is 27.0-28.0 PSI (with DHD2 compound - 2018-19 tracks. This compound has better grip outside the optimum range, but less grip in the optimum range). |
==== Tire Temperatures ==== <!--T:42--> | ==== Tire Temperatures ==== <!--T:42--> | ||
<!--T:44--> | <!--T:44--> | ||
| − | On the tire HUD display, the three temperature zones ( | + | On the tire HUD display, the three temperature zones (O-M-I or I-M-O) are visualized by three bars. Their color areas change depending on the temperature: Blue - Turquoise - Light Green - Green - Yellow - Orange - Red. |
| − | + | Numerical temperature values can be seen either in the cockpit (depending on vehicle type) or in the setup menu. | |
<!--T:45--> | <!--T:45--> | ||
| Line 89: | Line 89: | ||
* [[MoTeC_Support|MoTeC must be installed beforehand!]] | * [[MoTeC_Support|MoTeC must be installed beforehand!]] | ||
|- | |- | ||
| − | | TC2 || | + | | TC2 || 0 - ? || Secondary traction control setting. Lower values indicate a lower strength of intervention. Only available on some cars. |
|} | |} | ||
| Line 102: | Line 102: | ||
! Property !! Values !! Description | ! Property !! Values !! Description | ||
|- | |- | ||
| − | | Wear ||style="text-align:center;"| 3.00 to | + | | Wear ||style="text-align:center;"| 3.00 to 0.00 || Amount of tyre tread remaining in millimetres. At 3mm, the tyre is new. At 1.5mm, the tyre is considered worn and it is recommended to replace it. |
|- | |- | ||
| Grain ||style="text-align:center;"| None to Heavy || Graining is a specific pattern of tyre wear that occurs when the tyre withstands large amounts of scrubbing or sliding, usually from understeering. | | Grain ||style="text-align:center;"| None to Heavy || Graining is a specific pattern of tyre wear that occurs when the tyre withstands large amounts of scrubbing or sliding, usually from understeering. | ||
| Line 108: | Line 108: | ||
| Blister ||style="text-align:center;"| None to Heavy || Blistering is when the layers of rubber that make up the tyre start to separate from each other. Usually caused by having very high heat levels. | | Blister ||style="text-align:center;"| None to Heavy || Blistering is when the layers of rubber that make up the tyre start to separate from each other. Usually caused by having very high heat levels. | ||
|- | |- | ||
| − | | Flat Spot ||style="text-align:center;"| None to Heavy || | + | | Flat Spot ||style="text-align:center;"| None to Heavy || Flat spotting occurs when the tyre locks up under braking,` and a specific section of the tyre receives much more wear than the rest. This causes an unpleasant juddering in the wheel, and can cause punctures in extreme circumstances. |
|- | |- | ||
| − | | pad wear ||style="text-align:center;"| | + | | pad wear ||style="text-align:center;"| 29.00 to 0.00 || The amount that the brake pads have worn in millimetres. At 12.5mm, the brakes are considered worn and it is recommended to replace them. |
|- | |- | ||
| − | | disc wear ||style="text-align:center;"| | + | | disc wear ||style="text-align:center;"| 31.00 to 0.00 || The amount that the brake discs have worn in millimetres. Usually, a set of discs will make a 24 hour race, but new discs are always fitted when brake pads are changed with no additional time penalty. |
|- | |- | ||
!colspan="3"| Fuel and Tyre | !colspan="3"| Fuel and Tyre | ||
|- | |- | ||
| − | | fuel ||style="text-align:center;"| 1 - ? || | + | | fuel ||style="text-align:center;"| 1 - ? || The amount of fuel in the fuel tank upon exiting the pits/going to track. Maximum fuel load varies per car. |
|- | |- | ||
| − | | tyre ||style="text-align:center;"| | + | | tyre ||style="text-align:center;"| Dry or Wet || Choose the type of tyre depending on prevailing track conditions. |
|- | |- | ||
| tyre set [https://www.assettocorsa.net/forum/index.php?threads/race-weekend-tyre-sets-management-pitstop-strategy-and-fuel-load-testing.57824]||style="text-align:center;"| 1 - ? || | | tyre set [https://www.assettocorsa.net/forum/index.php?threads/race-weekend-tyre-sets-management-pitstop-strategy-and-fuel-load-testing.57824]||style="text-align:center;"| 1 - ? || | ||
| Line 132: | Line 132: | ||
| rear brakes ||style="text-align:center;"| 1 - 4 || Choose the ↓[[Car_Setups_and_Pitstop#Brake_pads|Brake Pads]] on the rear axle. | | rear brakes ||style="text-align:center;"| 1 - 4 || Choose the ↓[[Car_Setups_and_Pitstop#Brake_pads|Brake Pads]] on the rear axle. | ||
|- | |- | ||
| − | | fuel | + | | fuel per lap ||style="text-align:center;"| || Average fuel consumption per lap. Automatically calculated. |
|- | |- | ||
!colspan="3"| Pitstop Strategy | !colspan="3"| Pitstop Strategy | ||
| Line 146: | Line 146: | ||
| left front ||style="text-align:center;"| || | | left front ||style="text-align:center;"| || | ||
|- | |- | ||
| − | | | + | | right front ||style="text-align:center;"| || |
|- | |- | ||
| left rear ||style="text-align:center;"| || | | left rear ||style="text-align:center;"| || | ||
| Line 152: | Line 152: | ||
| right rear||style="text-align:center;"| || | | right rear||style="text-align:center;"| || | ||
|- | |- | ||
| − | | front brakes ||style="text-align:center;"| 1 - 4 || | + | | front brakes ||style="text-align:center;"| 1 - 4 || Choose the ↓[[Car_Setups_and_Pitstop#Brake_pads|Brake Pads]] on the front axle. |
|- | |- | ||
| − | | rear brakes ||style="text-align:center;"| 1 - 4 || | + | | rear brakes ||style="text-align:center;"| 1 - 4 || Choose the ↓[[Car_Setups_and_Pitstop#Brake_pads|Brake Pads]] on the rear axle. |
|} | |} | ||
| Line 241: | Line 241: | ||
!colspan="3"| Rear | !colspan="3"| Rear | ||
|- | |- | ||
| − | | rear ride height ||style="text-align:center;"| || | + | | rear ride height ||style="text-align:center;"| || Higher values offer stability over kerbs but reduce overall downforce. |
|- | |- | ||
| − | | | + | | rear wing ||style="text-align:center;"| 0 - ? || Higher values increase drag but provide rear stability. |
|- | |- | ||
| − | | brake ducts ||style="text-align:center;"| | + | | brake ducts ||style="text-align:center;"| 0 - 6 || How much cooling the brake discs receive. 0 is fully closed, 6 is fully open. Affects aerodynamics somewhat. |
|- | |- | ||
!colspan="3"| Front | !colspan="3"| Front | ||
|- | |- | ||
| − | | front ride height ||style="text-align:center;"| || | + | | front ride height ||style="text-align:center;"| || Higher values offer stability over kerbs but reduce overall downforce. |
|- | |- | ||
| − | | splitter ||style="text-align:center;"| | + | | splitter ||style="text-align:center;"| 0 - ? || Higher values increase drag slightly but provide front grip. Only adjustable on some cars. |
|- | |- | ||
| − | | brake ducts ||style="text-align:center;"| | + | | brake ducts ||style="text-align:center;"| 0 - 6 || How much cooling the brake discs receive. 0 is fully closed, 6 is fully open. Affects aerodynamics somewhat |
|- | |- | ||
!colspan="3"| Fuel Load Test | !colspan="3"| Fuel Load Test | ||
| Line 289: | Line 289: | ||
* Once the timer hits 0, a "Rolling Start Procedure" warning is given. | * Once the timer hits 0, a "Rolling Start Procedure" warning is given. | ||
* The pole-sitter starts first and all other vehicles are now unlocked one after the other and drivers can then engage 1st gear and drive off. Note: Collisions not are possible, cars can drive through each other. | * The pole-sitter starts first and all other vehicles are now unlocked one after the other and drivers can then engage 1st gear and drive off. Note: Collisions not are possible, cars can drive through each other. | ||
| − | * A widget is now displayed for every driver and you are asked to ... | + | * A widget is now displayed for every driver and you are asked to... |
** Drive in double file if not doing a full formation lap. | ** Drive in double file if not doing a full formation lap. | ||
** Start in single file, then slow down and change to double file, usually before the last corner. | ** Start in single file, then slow down and change to double file, usually before the last corner. | ||
| − | * By always being on the green | + | * By always being on the green coloured scale of the widget, you are always in the right starting position. |
* Shortly before the start, the widget will switch to a speed monitoring mode. Try to keep the speed in the green. | * Shortly before the start, the widget will switch to a speed monitoring mode. Try to keep the speed in the green. | ||
* Soon after the leader crosses the start-finish line, five flashing green lights will appear, and the race starts! | * Soon after the leader crosses the start-finish line, five flashing green lights will appear, and the race starts! | ||
Revision as of 10:45, 21 April 2021
Car Setup
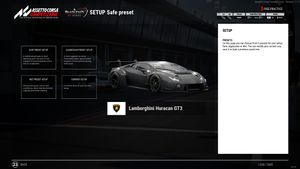
You have a choice of preset setups you can load, or you can resume editing the currently loaded setup. (When loading into a session, the currently loaded setup is the Safe preset.)
- Safe Preset Setup
- Aggressive Preset Setup
- Wet Preset Setup
- Current Setup
Tyres
Tire Pressures
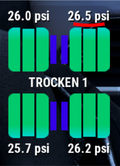
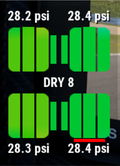
The current psi values are displayed in the tire app. Inflation is represented by the different heights of the middle bars. The color of the three bars represent the differences in temperature of the three tire zones. At the front wheels, the surface temperature is indicated at the top, at the rear wheels, it is indicated at the bottom.
Follow these steps to tune your tyre pressures:
- Drive 5-10 laps and watch the tire pressures at the end of the longest straight, usually at the start/finish line.
- The optimum GT3 tyre pressure is between 27.3 and 27.9 PSI (with DHE compound - 2020 tracks). For GT4 cars, tyre pressures between 26.8 and 27.4 PSI are optimal. For wet tyres, pressures between 30.0 and 31.0 PSI are optimal. Going under this will result in underinflation and a loss of grip, going over this will result in overinflation and a loss of grip.
- The default settings usually give you lower values. Increase the values in the tire setup menu to compensate for this difference.
- To adjust for changing track temperatures, remember the following ratio: .08 psi for every 1C air temperature change. When the temperature increases, decrease the pressure, and vice versa.
Note: On 2018-2019 tracks, the optimum tire pressure is 27.0-28.0 PSI (with DHD2 compound - 2018-19 tracks. This compound has better grip outside the optimum range, but less grip in the optimum range).
Tire Temperatures
On the tire HUD display, the three temperature zones (O-M-I or I-M-O) are visualized by three bars. Their color areas change depending on the temperature: Blue - Turquoise - Light Green - Green - Yellow - Orange - Red. Numerical temperature values can be seen either in the cockpit (depending on vehicle type) or in the setup menu.
| Property | Values | Description |
|---|---|---|
| Last Readings | Snapshot of the states of your wheels | |
| O M I / I M O | 80 84 88 | Temperatures (°C) of the Tires: (O)utside (M)iddle (I)nside or (I)nside (M)iddle (O)utside |
| psi hot | 27.3 | highest recorded pressure |
| wear | 2.95 2.94 2.94 | Degree of wear (O M I / I M O). 3.00 is new, 1.5 is worn out. |
| Tires | Adjustments for your wheels / suspension | |
| psi | 25.2 psi | Starting pressure of the tyre. For GT3, this is the pressure while under the tyre warmers. For GT4, which doesn't allow tyre warmers, this is the cold pressure. |
| toe | 0.2° | This is the angle offset of the wheel relative to the direction of travel. https://en.wikipedia.org/wiki/Toe_(automotive) |
| camber | -4.1° | This is the vertical angle of the wheel relative to the roadway. https://en.wikipedia.org/wiki/Camber_angle |
| caster | -10.6° | This is the vertical angle of the rotational axis of the steering hub on the front wheels. https://en.wikipedia.org/wiki/Caster_angle |
Electronics
| Property | Values | Description |
|---|---|---|
| TC | 0 - ? | Primary traction control setting. Lower values indicate a lower strength of intervention. |
| ABS | 0 - ? | Anti-lock braking system setting. Lower values indicate a lower strength of intervention. |
| ECU Map | Engine control unit mapping. Defines the amount of fuel sent to the engine, as well as throttle maps and engine braking. ECU Maps | |
| telemetry laps | 0 - 99 | This sets the number of laps to be recorded to the MoTeC datalogging file. |
| TC2 | 0 - ? | Secondary traction control setting. Lower values indicate a lower strength of intervention. Only available on some cars. |
Fuel and Strategy
| Property | Values | Description |
|---|---|---|
| Wear | 3.00 to 0.00 | Amount of tyre tread remaining in millimetres. At 3mm, the tyre is new. At 1.5mm, the tyre is considered worn and it is recommended to replace it. |
| Grain | None to Heavy | Graining is a specific pattern of tyre wear that occurs when the tyre withstands large amounts of scrubbing or sliding, usually from understeering. |
| Blister | None to Heavy | Blistering is when the layers of rubber that make up the tyre start to separate from each other. Usually caused by having very high heat levels. |
| Flat Spot | None to Heavy | Flat spotting occurs when the tyre locks up under braking,` and a specific section of the tyre receives much more wear than the rest. This causes an unpleasant juddering in the wheel, and can cause punctures in extreme circumstances. |
| pad wear | 29.00 to 0.00 | The amount that the brake pads have worn in millimetres. At 12.5mm, the brakes are considered worn and it is recommended to replace them. |
| disc wear | 31.00 to 0.00 | The amount that the brake discs have worn in millimetres. Usually, a set of discs will make a 24 hour race, but new discs are always fitted when brake pads are changed with no additional time penalty. |
| Fuel and Tyre | ||
| fuel | 1 - ? | The amount of fuel in the fuel tank upon exiting the pits/going to track. Maximum fuel load varies per car. |
| tyre | Dry or Wet | Choose the type of tyre depending on prevailing track conditions. |
| tyre set [1] | 1 - ? |
This allows you to change your currently installed tyre set. The sets are limited as follows:
|
| front brakes | 1 - 4 | Choose the ↓Brake Pads on the front axle. |
| rear brakes | 1 - 4 | Choose the ↓Brake Pads on the rear axle. |
| fuel per lap | Average fuel consumption per lap. Automatically calculated. | |
| Pitstop Strategy | ||
| N°. | ||
| fuel to add | ||
| tyre | ||
| tyre set | ||
| left front | ||
| right front | ||
| left rear | ||
| right rear | ||
| front brakes | 1 - 4 | Choose the ↓Brake Pads on the front axle. |
| rear brakes | 1 - 4 | Choose the ↓Brake Pads on the rear axle. |
Brake pads
| Value | Description |
|---|---|
| 1 | "Sprint" brake pads. Excellent friction coefficient with maximum braking performance but rather severe disc and pad wear. Performance with brake modulation is somewhat linear. Perfect for short (1-3) hour races and qualifying sessions. It is best not to use these pads beyond 2 hours of racing as they will quickly start to overheat and lose linearity in brake pedal feel when worn out, making braking consistently a lot harder, and the pads may wear out before the 3 hour distance is reached. |
| 2 | "Endurance" brake pads. Very good friction coefficient with great braking performance and moderate disc and pad wear. Performance with brake modulation is very linear. Perfect for long (3+ hours) endurance races, but can also be used in shorter races and qualifying/hotlap sessions. What it loses in outright performance, it gains in braking predictability and a more consistent feeling. It is the default choice for long endurance races, as it easily lasts 12 hours' distance, and with a bit of care will make a full 24 hour race. It will still overheat and lose linearity in brake pedal feel when worn out, but in a more predictable way than brake pads 1, and after much longer stints. Because of the lower friction, you could possibly use smaller brake ducts, which will help keep tyre temperatures and pressures more consistent. |
| 3 | "Rain" brake pads. Good friction coefficient with good braking performance and low disc and pad wear. Performance with brake modulation is almost always linear. Will easily make a 24 hour race without issues. The lower friction coefficient means that braking distances in optimal conditions will be longer than with pads 1 or 2, but these pads are an excellent choice for wet weather conditions where more care is needed when braking. These pads rarely have issues with overheating when worn. |
| 4 | "Superpole" brake pads. These pads are functionally useless. They have a very similar friction coefficient to brake pads 1, however they suffer from extreme disc and pad wear and it is very hard to get a linear response from these pads - as they wear down and overheat very quickly, usually within 15 minutes. These pads should almost never be used and do not exist in the world of endurance racing - they are only included for demonstration purposes. |
Mechanical Grip
| Property | Values | Description |
|---|---|---|
| Front | ||
| antiroll bar | ||
| brake power | ||
| brake bias | ||
| steer ratio | ||
| Rear | ||
| antiroll bar | ||
| preload differential | ||
| Rear/Front - Left/Right | ||
| wheel rate | ||
| bumpstop rate | ||
| bumpstop range | ||
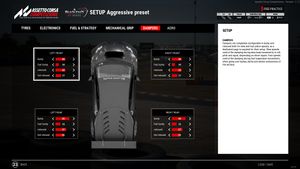
Dampers
| Property | Values | Description |
|---|---|---|
| Rear/Front - Left/Right | ||
| bump | stops the springs oscillation inward. A higher number wil dampen the compression at a slow rate more. | |
| fast bump | A higher number wil dampen the compression at a high rate more. | |
| rebound | stops the springs oscillation outward. A higher number wil dampen the decompression at a slow rate more. | |
| fast rebound | A higher number wil dampen the decompression at a high rate more. | |
Aero
| Property | Values | Description |
|---|---|---|
| Rear | ||
| rear ride height | Higher values offer stability over kerbs but reduce overall downforce. | |
| rear wing | 0 - ? | Higher values increase drag but provide rear stability. |
| brake ducts | 0 - 6 | How much cooling the brake discs receive. 0 is fully closed, 6 is fully open. Affects aerodynamics somewhat. |
| Front | ||
| front ride height | Higher values offer stability over kerbs but reduce overall downforce. | |
| splitter | 0 - ? | Higher values increase drag slightly but provide front grip. Only adjustable on some cars. |
| brake ducts | 0 - 6 | How much cooling the brake discs receive. 0 is fully closed, 6 is fully open. Affects aerodynamics somewhat |
| Fuel Load Test | ||
| temporary fuel | 0 litre - ? litre | Simulates the weight of the contents of the tank and the impact on the aero model of the car. Depending on where the tank is located in a car, it has different effects. |
| Front Aero Variation | ||
| Base ride height | xx rear - xx front x.x% | |
Race Start Procedure
In ACC, a server administrator can specify three different methods for starting on a server (→ Server Configuration/settings.json) and whether a short or a complete Formation-Lap should take place.
Controlled Start with Position Widget
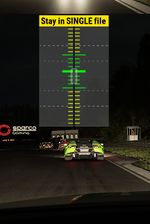
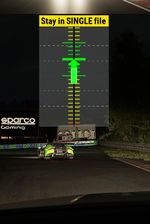
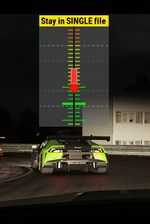
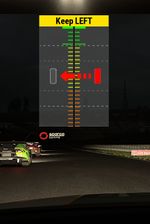
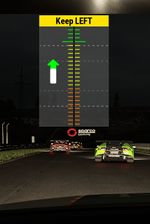
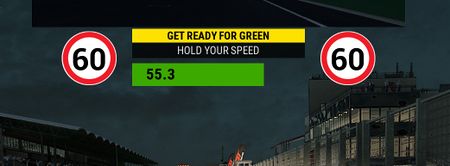
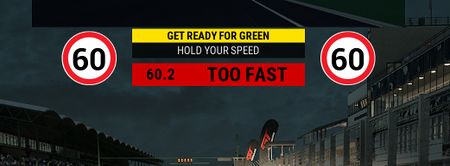
Each driver is guided through the start of the race by a widget. The driver must always try to stay in the green area. First is the single file at 90 km/h (if doing a full formation lap), then the double file at 60 km/h.
| ||||||
 |
 |
 |
 |
 |
 |
|
 |
| |||||
- You can press "Drive" 30 seconds before the end of the countdown. Don't forget to fill up on fuel, or change to your race setup.
- You can now start your vehicle, but not change the gear or move.
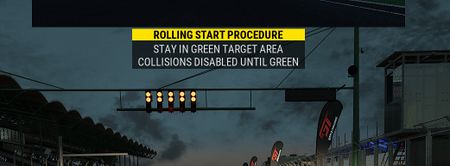
- Once the timer hits 0, a "Rolling Start Procedure" warning is given.
- The pole-sitter starts first and all other vehicles are now unlocked one after the other and drivers can then engage 1st gear and drive off. Note: Collisions not are possible, cars can drive through each other.
- A widget is now displayed for every driver and you are asked to...
- Drive in double file if not doing a full formation lap.
- Start in single file, then slow down and change to double file, usually before the last corner.
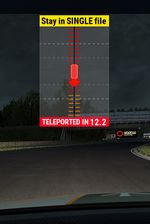
- By always being on the green coloured scale of the widget, you are always in the right starting position.
- Shortly before the start, the widget will switch to a speed monitoring mode. Try to keep the speed in the green.
- Soon after the leader crosses the start-finish line, five flashing green lights will appear, and the race starts!
- Drive-through penalties are awarded for driving too fast and not adhering to the starting position.
Old Mode
- You can press "Drive" 30 seconds before the end of the countdown. Don't forget to fill up on fuel, or change to your race setup.
- You can now start your vehicle, but not change the gear or move.
- Once the timer hits 0, everyone can drive off. Note: collisions are possible, so don't try to drive through other cars.
- The vehicle's speeds are locked at around 90km/h
- There is no positional control, cars are free to be in whatever position possible. As such, no penalties are awarded automatically.
Free Mode
At the start of the race, only the traffic lights are shown. This is usually only used by leagues that have their own race control.
Pitstop
A pit stop to refuel missing gas or repair damage is possible in practice, qualifying and racing. A driver can set his pit stop strategy in the vehicle setup (Fuel and Strategy) and change it while driving in the multifunction display (MFD). In a race without a compulsory pit stop, the pit lane is opened when the leader of the race has finished the first lap. In the middle of the lower part of the screen, the message of the race control is displayed: RCTL Pitlane is open
Server Configuration, see here: →eventRules.json
Mandatory Pitstop
- Variant 1: mandatory Pitstop possible throughout the race.
- Variant 2: mandatory Pitstop Window is limited in time. (Pitstop for damage repair always possible)
- Example: Race: 18 min / Window: 6min = from 6. Minute to 12. Minute

- What can be required for a mandatory pit stop?
- refueling
- change wheels
- driver swap
Server Configuration, see here: →eventRules.json
Driver Swap
(in MP: Swapping the riders works, but the operation is not intuitive and faulty! Last time tested: 17.11.2019 ACCv1.1.2)
Several drivers (in Blancpain real: 2-4) can form a team. All drivers can be on the server. The waiting drivers are not considered spectators in the sense of →Spectator Mode.
Using the Pit strategy page in the ( M )ulti(F )unctional( D )isplay (key: insert), the driver can assign a driver swap which will be automatically executed during the next pitstop.
In a training or qualification session, drivers of a team can use the chat command to swap drivers while the car is in the pit lane. Simply use the chat command and enter the space in the team widget. For example in "& swap 1" the driver changes to the driver who comes first. The waiting driver must be on the server.
Server Configuration, see here: →eventRules.json and →entylist.json
References
- Suspension and Spart... setups, I mean setups! - Kunos Forum - ACC Blog von Aristotelis
- ECU maps implementation - Kunos Forum - ACC Blog von Aristotelis
- Brake ducts and Tyre damage - Kunos Forum - ACC Blog von Aristotelis
- Bumpstop telemetry in the setup screen - Kunos Forum - ACC Blog von Aristotelis
- https://en.wikipedia.org/wiki/Caster_angle
- https://en.wikipedia.org/wiki/Camber_angle
- MSRL - Midnight Sim Racing Liga - YouTube Playlist: MSRL SetupGuide (German):
