Difference between revisions of "Car Setups and Pitstop/en"
(Updating to match new version of source page) |
(Updating to match new version of source page) |
||
| Line 125: | Line 125: | ||
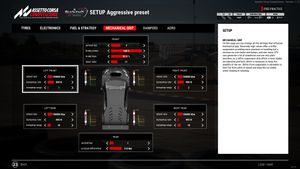
[[File:Acc wiki carsetup engl 5.jpg|thumb|Current Setup / TAB Mechanical Grip]] | [[File:Acc wiki carsetup engl 5.jpg|thumb|Current Setup / TAB Mechanical Grip]] | ||
| + | |||
| + | {| class="wikitable" | ||
| + | |- | ||
| + | ! Property !! Values !! Description | ||
| + | |- | ||
| + | !colspan="3"| Front | ||
| + | |- | ||
| + | | antiroll bar ||style="text-align:center;"| || | ||
| + | |- | ||
| + | | brake power ||style="text-align:center;"| || | ||
| + | |- | ||
| + | | brake bias ||style="text-align:center;"| || | ||
| + | |- | ||
| + | | steer ratio ||style="text-align:center;"| || | ||
| + | |- | ||
| + | !colspan="3"| Rear | ||
| + | |- | ||
| + | | antiroll bar ||style="text-align:center;"| || | ||
| + | |- | ||
| + | | preload differential ||style="text-align:center;"| || | ||
| + | |- | ||
| + | !colspan="3"| Rear/Front - Left/Right | ||
| + | |- | ||
| + | | wheel rate ||style="text-align:center;"| || | ||
| + | |- | ||
| + | | bumpstop rate ||style="text-align:center;"| || | ||
| + | |- | ||
| + | | bumpstop range ||style="text-align:center;"| || | ||
| + | |} | ||
=== Dampers === | === Dampers === | ||
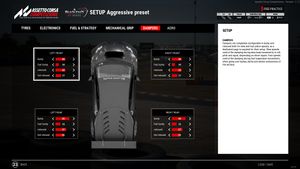
[[File:Acc wiki carsetup engl 6.jpg|thumb|Current Setup / TAB Dampers]] | [[File:Acc wiki carsetup engl 6.jpg|thumb|Current Setup / TAB Dampers]] | ||
| + | |||
| + | {| class="wikitable" | ||
| + | |- | ||
| + | ! Property !! Values !! Description | ||
| + | |- | ||
| + | !colspan="3"| Rear/Front - Left/Right | ||
| + | |- | ||
| + | | bump ||style="text-align:center;"| || | ||
| + | |- | ||
| + | | fast bump ||style="text-align:center;"| || | ||
| + | |- | ||
| + | | rebound ||style="text-align:center;"| || | ||
| + | |- | ||
| + | | fast rebound ||style="text-align:center;"| || | ||
| + | |} | ||
=== Aero === | === Aero === | ||
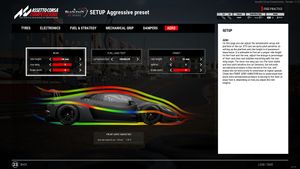
[[File:Acc wiki carsetup engl 7.jpg|thumb|Current Setup / TAB Aero]] | [[File:Acc wiki carsetup engl 7.jpg|thumb|Current Setup / TAB Aero]] | ||
| + | |||
| + | {| class="wikitable" | ||
| + | |- | ||
| + | ! Property !! Values !! Description | ||
| + | |- | ||
| + | !colspan="3"| Rear | ||
| + | |- | ||
| + | | right height ||style="text-align:center;"| || | ||
| + | |- | ||
| + | | rearwing ||style="text-align:center;"| || | ||
| + | |- | ||
| + | | brake ducts ||style="text-align:center;"| || | ||
| + | |- | ||
| + | !colspan="3"| Front | ||
| + | |- | ||
| + | | right height ||style="text-align:center;"| || | ||
| + | |- | ||
| + | | splitter ||style="text-align:center;"| || | ||
| + | |- | ||
| + | | brake ducts ||style="text-align:center;"| || | ||
| + | |- | ||
| + | !colspan="3"| Fuel Load Test | ||
| + | |- | ||
| + | | temporary fuel ||style="text-align:center;"| 0 litre - ? litre || Simulates the weight of the contents of the tank and the impact on the aero model of the car. Depending on where the tank is located in a car, it has different effects. | ||
| + | |- | ||
| + | !colspan="3"| Front Aero Variation | ||
| + | |- | ||
| + | | Base ride height ||style="text-align:center;"| xx rear - xx front x.x% || | ||
| + | |} | ||
== Pitstop == | == Pitstop == | ||
Revision as of 13:16, 20 November 2019
Car Setup
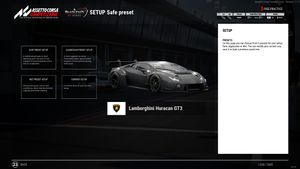
You have a choice of preset setups or you have the option to go directly to the currently setup:
- Safe Preset Setup
- Aggressive Preset Setup
- Wet Preset Setup
- Current Setup
Tyres
Tire Pressures
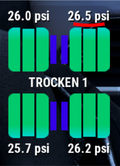
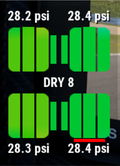
The current psi values are displayed in the tire app. Zursätzlich is represented by the different heights, at the three large bars, the differences in the three tire zones. At the front wheels above and at the rear wheels below.
- Drive 10 laps and watch the tire pressure. At the end of the curve and at the end of the longest straight.
- good values are dry 28,0 - 28,5 psi and wet / cold ~30 psi
- The default settings usually give you lower values. Increase the values in the tire setup menu to compensate for this difference.
- drive a few more rounds and watch the psi values.
Tire Temperatures
In the tire app, the three temperature zones (OMI or IMO) are visualized by three bars. Their color areas change depending on the temperature. Turquoise - Blue - Light Green - Green - Orange - Red. The temperature values can be seen either in the cockpit (depending on the vehicle type) or in the setup menu
| Property | Values | Description |
|---|---|---|
| Last Readings | Snapshot of the states of your wheels | |
| O M I / I M O | 80 84 88 | Temperatures (°C) of the Tires: (O)utside (M)iddle (I)nside or (I)nside (M)iddle (O)utside |
| psi hot | 27.3 | highest recorded pressure |
| wear | 2.95 2.94 2.94 | Degree of wear (O M I / I M O) |
| Tires | Adjustments for your wheels / suspension | |
| psi | 25.2 psi | Pressure when tire is not stressed |
| toe | 0.2° | the position of the wheel to the direction of travel |
| camber | -4.1° | the position of the wheel to the roadway / https://en.wikipedia.org/wiki/Camber_angle |
| caster | -10.6° | Only on the front wheels! https://en.wikipedia.org/wiki/Caster_angle |
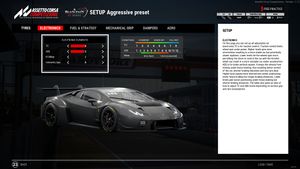
Eletronics
| Property | Values | Description |
|---|---|---|
| TC | 0 - ? | Traction Control |
| ABS | 0 - ? | Anti-lock braking system |
| ECU Map | Engine control unit | |
| telemetry laps | 0 - 30 | Here you set the number of laps to be recorded for the tool MoTeC. |
| TC2 |
Fuel and Strategy
| Property | Values | Description |
|---|---|---|
| Wear | ||
| Grain | ||
| Blister | ||
| First Spot | ||
| Fuel and Tyre | ||
| fuel | ||
| tyre | ||
| tyre set | ||
| fuel last lap | ||
| Pitstop Strategy | ||
| N°. | ||
| fuel to add | ||
| tyre | ||
| tyre set | ||
| left front | ||
| rigth front | ||
| left rear | ||
| right rear | ||
Mechanical Grip
| Property | Values | Description |
|---|---|---|
| Front | ||
| antiroll bar | ||
| brake power | ||
| brake bias | ||
| steer ratio | ||
| Rear | ||
| antiroll bar | ||
| preload differential | ||
| Rear/Front - Left/Right | ||
| wheel rate | ||
| bumpstop rate | ||
| bumpstop range | ||
Dampers
| Property | Values | Description |
|---|---|---|
| Rear/Front - Left/Right | ||
| bump | ||
| fast bump | ||
| rebound | ||
| fast rebound | ||
Aero
| Property | Values | Description |
|---|---|---|
| Rear | ||
| right height | ||
| rearwing | ||
| brake ducts | ||
| Front | ||
| right height | ||
| splitter | ||
| brake ducts | ||
| Fuel Load Test | ||
| temporary fuel | 0 litre - ? litre | Simulates the weight of the contents of the tank and the impact on the aero model of the car. Depending on where the tank is located in a car, it has different effects. |
| Front Aero Variation | ||
| Base ride height | xx rear - xx front x.x% | |
Pitstop
A pit stop to refuel missing gas or repair damage is possible in practice, qualifying and racing. A driver can set his pit stop strategy in the vehicle setup (Fuel and Strategy) and change it while driving in the multifunction display (MFD). In a race without compulsory pit stop, the pit lane is opened when the leader of the race has finished the first lap. In the middle of the lower part of the screen the message of the race control is displayed: RCTL Pitlane is open
Server Configuration, see here: →eventRules.json
Mandatory Pitstop
- Variant 1: mandatory Pitstop possible throughout the race.
- Variant 2: mandatory Pitstop Window is limited in time. (Pitstop for damage repair always possible)
- Example: Race: 18 min / Window: 6min = from 6. Minute to 12. Minute

- What can be required for a mandatory pit stop?
- refueling
- change wheels
- driver swap
Server Configuration, see here: →eventRules.json
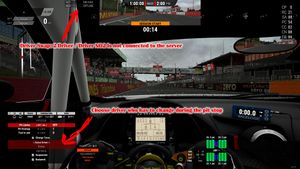
Driver Swap
(in MP: Swapping the riders works, but the operation is not intuitive and faulty! Last time tested: 17.11.2019 ACCv1.1.2)
Several drivers (in Blanpain real: 2-4) can form a team. All drivers can be on the server. The waiting drivers are not considered spectators in the sense of →Spectator Mode.
Using the Pit strategy page in the ( M )ulti(F )unctional( D )isplay (key: insert), the driver can assign a driver swap which will be automatically executed during the next pitstop.
Server Configuration, see here: →eventRules.json and →entylist.json
References
- Suspension and Spart... setups, I mean setups! - Kunos Forum - ACC Blog von Aristotelis
- ECU maps implementation - Kunos Forum - ACC Blog von Aristotelis
- Brake ducts and Tyre damage - Kunos Forum - ACC Blog von Aristotelis
- Bumpstop telemetry in the setup screen - Kunos Forum - ACC Blog von Aristotelis
- https://en.wikipedia.org/wiki/Caster_angle
- https://en.wikipedia.org/wiki/Camber_angle
- MSRL - Midnight Sim Racing Liga - YouTube Playlist: MSRL SetupGuide (German):
